home aboutme myart books shop
Showing posts with label felt. Show all posts

Friday, 30 August 2024

Felt Pizza Kit

My son is very much in his Bluey era and particularly enjoys the Pizza Girls episode, so I thought he would enjoy his own pizza kit to play with. I'd seen some nice homemade ones online made with cardboard, but I thought that all the pieces would just slide around so I went for felt.


I found some thick wadding and cut out a circle from it. I used a paper plate to draw around. Then I cut two circles out of beige felt. Ideally I would have wanted to use a slightly darker coloured felt, but I had a lot of this beige so the pizza base just looks a little under cooked.
I also cut a long strip of the felt which I pinned to the edge of the circle and sewed on, going through all the layers. 


The pizza base turned out a lot better than I was expecting. The thick wadding works really well as it means the base is not too floppy.


Next I headed to my felt stash to work on the pizza toppings. I went with ham, olives, cheese, green peppers, chicken, onions, pepperoni and mushrooms. If you've seen the episode of Bluey you'll know that mushrooms are a must!
I also cut out a wobbly red circle of felt for the tomato sauce. I've seen some people do this for the cheese as well but I went with strips. My son has to have dairy free cheese so his cheese looks more like this as it's terrible at melting!


I wanted to keep all the toppings organised in a container and remembered I had this wooden box with compartments and a lid. I roughly drew all the toppings on my computer and added the names, then printed them out and stuck them in the box with double sided sticky tape.


Everything fits almost perfectly, and I have one space left should I think of anything else. I'd thought about sweetcorn, which my son really likes, but I did not like the idea of tiny yellow squares of felt existing in my house. So that spot is staying empty for now.

Then I went on Canva and designed a menu, which I laminated, and an ingredients label for the box.


This whole project actually started because my Dad was getting rid of a box that was the same size as a pizza box. So I added the logo to that by printing it on sticker paper. All the elements - the pizza, toppings box and menu - fit in this box so it's easy to tidy away.

So far the pizza kit is a hit. Although my son will take our order but then put whatever toppings he wants on anyway. And there's always mushrooms!

Friday, 3 March 2023

Harry Potter Fabric

A few years ago my sister gave me some scraps of Harry Potter fabric and since then they have just been sitting in my fabric drawers, waiting.

Then this past week I finally dug them out and made something with them!  

Here's what I had to work with. The pieces are very small and some have the house crest very close to the edge. And sorry Hufflepuffs, you don't get represented here. I don't know why there isn't fabric for all four houses, this is just what I was given.


The first thing I made was this Slytherin zipper pouch, as that was the biggest piece I had to work with. I used some black fabric, including some black leatherette, and matching green ribbon.

I then made a Gryffindor pouch but didn't have a strip of the fabric long enough to fill the pouch, so instead I cut out the crest, gave it a felt border and sewed it to some matching red fabric.

With a few more pieces of the fabric I made these hanging decorations. To make these I cut out the shapes using my Cricut and added some iron-on interfacing behind the fabric. Then I sewed the pieces together, adding in these strings of shiny beads.
I could see these hanging on a Harry Potter fan's Christmas tree. It's a shame about that missing Hufflepuff fabric as it would have been nice to make a whole set.

It was great to add a few more items to my craft fair stock using materials that I already had. The various fabrics, zips, felt and embellishments all came from my craft stash, which shows that I should never throw anything away as you never know when it'll come in useful!

Saturday, 18 February 2023

Sweet Treat Keyrings

I recently bought a box of 100 key ring chains to start building up my stock. I want to do more craft fairs throughout the year, rather than just Christmas ones, so I need to make more non-Christmas items.

I've made donut keyrings before so I thought I'd continue with that theme and make some other sweet treats. I started with these felt ice lollies, featuring a real lolly stick.

Then I made some ice cream cones. This was a great little project because these treats can really be any colour so it gave me a chance to use some of the other colours in my felt stash, rather than the neutral colours I use all the time for my felt dogs.

For the ice cream cone I added some stitching detail with my sewing machine. I'm really pleased with how that turned out. I also really like this style of decorating with the sequins and beads.


 And finally I made a few cupcake keyrings, decorated with bead sprinkles.

So that used nine of the key ring chains. Now to think of something for the other 91...

Thursday, 14 November 2019

Felt Stockings

A few years ago I made a lot of little felt stockings that sold very well at craft fairs.

I wanted to bring them back this year with some different decorations. I started by doing some fancier Christmas designs. Love the gingerbread man!

Then I made a range of dog stockings to go along with my felt dog decorations. I've already put these in my Etsy shop and they've been quite popular.

To reach a different market I've made some superhero stockings, since the super hero crochet balls I made last year did so well.

And then I made a few character stockings which I think are so cute! I've got Pikachu, Olaf and Peppa Pig.

These are the perfect size for a little chocolate bar, or they'd look great with a few candy canes sticking out the top. Or even a few pens and pencils if you fancy a stationary stocking!

Sunday, 30 June 2019

Minnie Mouse Ears

To go with my mermaid hair bands and my unicorn hair bands I decided to make some Minnie Mouse ear hair bands!

To make the ears I cut out two pairs of felt circles with a curve at the bottom to fit around the hair band. 
I've had this flowery felt for ages but never found the right project to use it. Until now! I thought it would be a fun change from the traditional black and red Minnie Mouse ears.

I sewed the circles together, leaving the curved section open so I could fill them with polyester stuffing. Then I sewed the ears to the hair band. I always make sure to buy hair bands that are covered in fabric, rather than just made of plastic, so that I have something to sew on to.

I then made a bright pink fabric bow to coordinate with the ears and attached that to the hair band.

And then I made some more!
I had a great time looking through my fabric and felt stash for matching colours and patterns.

Which one is your favourite?

Thursday, 14 March 2019

Felt Flowers

If you follow me on Instagram you will have seen that I've been making a lot of felt flowers recently.

Don't judge the state of my mat!
Just before Christmas I treated myself to Cricut Maker and I've been exploring some of the patterns that come with it.
These flowers came from the felt flower wreath project.


To start off with I made a couple of hairbands with one large flower on.


I didn't follow the project exactly. This flower is made up of pieces from two different flowers, and I did my own thing for the centres.

Then I made a bunch more smaller flowers and used them to embellish the unicorn hairbands I made last year.

Basically, don't stand still for too long in my house or I might stick a felt flower to you!

Saturday, 17 November 2018

Custom Felt Dogs

Today I'm sharing a few of the custom felt dogs I've made recently.
As the countdown to Christmas has begun I've been getting lots of new orders coming my way.


I was really please with how this tricolour Corgi turned out. Look at that happy face! I went on to use this pattern as the basis for a standard Corgi in my shop which I've sold twice already.

This felt dog is @chunkithefrenchie on Instagram. He wears some great slogan t-shirts that are worth checking out.


I've started making some dogs with Santa hats on ready for Christmas, but this customer asked if I could do a hat wearing a baseball hat. Sure thing!
I had to google to find out which team this dog supports. Go Astros!

Follow @lisasfeltfriends on Instagram for all of my felt creations, and check out my Etsy shop.

Tuesday, 23 October 2018

Crochet Superhero Balls


Did you know that my crochet emoji balls are my second most pinned project? (My most pinned project is Baby Groot)
For this year's craft fairs I decided to make some other crochet balls. With all the superhero movies around I picked superhero logos.

My Mum crochets around tennis balls and then I add the details. The Batman and Superhero balls are pretty straightforward to make, after a little bit of tricky cutting out. For the Spiderman ball I sewed some black wool over the ball to make the web.


We're a big Deadpool household so I also made a Deadpool ball to go with the felt Deadpool decoration which you can find in my Etsy shop.

What other superhero logos should I make?

Tuesday, 9 October 2018

Winnie the Pooh Hairbands


My friend recently asked me if I'd make some photo props for her sister's baby shower. Her sister is pregnant with twins!
Having seen my unicorn hairband she asked if I could make something similar but with Winnie the Pooh characters, as this was the theme of the shower.

We decided on making the ears of Pooh, Piglet, Tigger and Eeyore. I found a pack of hairbands that included yellow, pink, orange and blue which was perfect.

I made paper patterns of the ears and cut them out of felt. I made them so the piece of felt would fold over the hairband.

The ears are pretty simple shapes, with only one or two elements to them. Plus a tuft of Eeyore's hair of course.

If the hairbands were for regular use I'd probably sew the felt together, but since they're for a one off event I decided to just glue them, which worked perfectly well.


Here's a photo of the selfie station my friend set up at the baby shower. Love that hashtag! #twinniethepooh

Pin it!


Tuesday, 11 September 2018

Novelty Hairbands

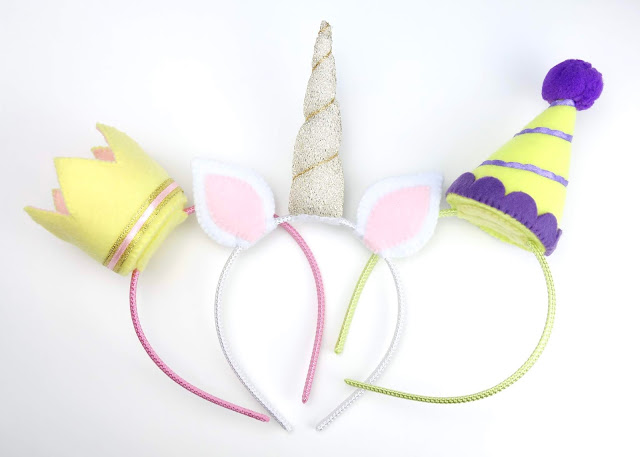
It will come as no surprise to you when I say that unicorns are very on trend right now. I've seen a lot of unicorn hairbands complete with horn and ears and always think that it would be fun to make my own, so I did.

Usually this is the sort of thing I would make completely out of felt but since the unicorn horn is special I had to dig through my regular fabric stash until I found this gold and sparkly fabric which, with enough stuffing, stands up on it's own.

I made one as a test and put it on my craft stall a couple of months ago and it was one of the first things to sell! So I bought a pack of hairbands to mass produce ready for Christmas craft fair season.

I also wanted to try some other styles, starting with this cute felt crown. I'm already thinking of different colour combinations.

And a little party hat! I think this could easily be modified especially for Christmas. Red with a white pom pom and trim? Or red and green complete with felt elf ears on the side?


Related Posts Plugin for WordPress, Blogger...