home aboutme myart books shop
Showing posts with label fabric. Show all posts

Friday, 3 March 2023

Harry Potter Fabric

A few years ago my sister gave me some scraps of Harry Potter fabric and since then they have just been sitting in my fabric drawers, waiting.

Then this past week I finally dug them out and made something with them!  

Here's what I had to work with. The pieces are very small and some have the house crest very close to the edge. And sorry Hufflepuffs, you don't get represented here. I don't know why there isn't fabric for all four houses, this is just what I was given.


The first thing I made was this Slytherin zipper pouch, as that was the biggest piece I had to work with. I used some black fabric, including some black leatherette, and matching green ribbon.

I then made a Gryffindor pouch but didn't have a strip of the fabric long enough to fill the pouch, so instead I cut out the crest, gave it a felt border and sewed it to some matching red fabric.

With a few more pieces of the fabric I made these hanging decorations. To make these I cut out the shapes using my Cricut and added some iron-on interfacing behind the fabric. Then I sewed the pieces together, adding in these strings of shiny beads.
I could see these hanging on a Harry Potter fan's Christmas tree. It's a shame about that missing Hufflepuff fabric as it would have been nice to make a whole set.

It was great to add a few more items to my craft fair stock using materials that I already had. The various fabrics, zips, felt and embellishments all came from my craft stash, which shows that I should never throw anything away as you never know when it'll come in useful!

Friday, 11 December 2020

Patchwork Christmas Stocking


Last summer my sister was helping me sort through my fabric drawers and encouraging me to get rid of the little scraps. She noted how much Christmas fabric I have piling up and suggested that if I hadn't used any of it in a year then I should probably re-home it.

So in order to save my beloved Christmas fabric I made this patchwork stocking!


I started by drawing out a template of a stocking on brown paper. I made two of these so that I could cut one up into the sections I had drawn out.


I used the paper sections to cut out shapes from my Christmas fabric. I'd labeled the sections with letters so that once they were separate like this I knew how they'd go back together.


Then I started sewing them together on my sewing machine, in pairs or threes, according to the template.


Then I joined the smaller groups together to form one big piece.


I cut out a back piece from red fabric and placed it with the patchwork front, along with some interfacing, and sewed them together.

I turned the stocking right side out and made a lining using the same stocking pattern and the red fabric.


Then I added a fabric loop so the stocking can be hung up.


It's a perfect celebration of all my Christmas fabric!

Monday, 15 June 2020

DIY Fabric Baskets


In another attempt to use some of my fabric stash I made these fabric storage baskets. Who can resist a storage basket!

I didn't take many photos of the process as the tutorial I followed does a much better job at showing how to do it. I used this tutorial by Fabric Mutt as a guide for making my baskets.

I altered the size of my baskets and did something different with the tops, but that tutorial is a great starting point. I also added a piece of card to the base of the basket, underneath the lining, so keep it square and add some strength.

I also tried out different things for the handles. For this one I made a strip of fabric and sewed the ends to the baskets with two buttons.

Shout out to my sister for this awesome unicorn fabric!
This fabric is a bit thinner than the navy florals so I added some interfacing behind it for some added support.

Now that I know how to make these baskets I'd love to go bigger and make a whole range of baskets.

Wednesday, 3 May 2017

Patchwork Blanket


Get comfy guys, this is going to be a long one...
I spent the second week of my Easter holiday making a patchwork blanket! I'm pretty surprised that it all worked and hasn't fallen apart as this is a pretty big project and I didn't do too much research beforehand.

The first step is, of course, to cut out all the squares. I decided on 7cm squares and cut a few pieces of paper to that size to use as templates. I wanted there to be a colour theme and used a great piece of fabric featuring parrots as a starting point. It's the bottom left one there and has green, blue, turquoise and purple in it, so I found other fabrics in my stash that matched those colours.

Once I'd started cutting out squares I decided to draw out a plan so I'd know exactly how many of each colour I'd need. I needed the plan as I wanted the squares to make a pattern. I don't have it in me to just do it randomly, everything has to be symmetrical, though this did mean extra work for me.

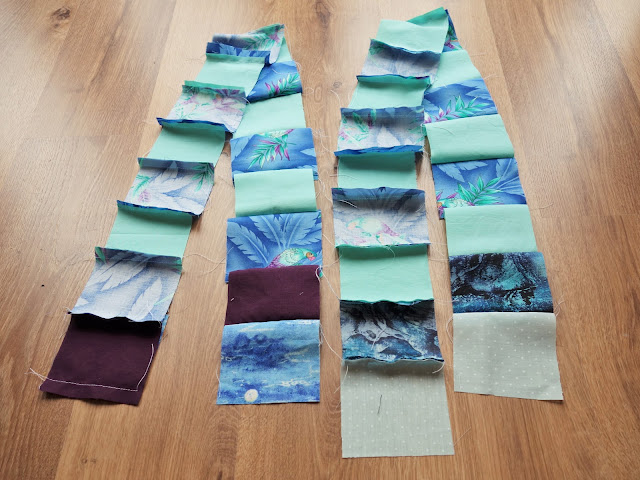
I laid out the squares in the pattern and then grouped them into strips.


I sewed the squares into strips and ironed down the seams. Then I sewed the strips together and my blanket started taking shape. There are a few parts where the squares don't quite align but they're not obvious unless you look closely so I'm happy.


Once the patchwork was complete I had to work on the back. I bought a roll of wadding which I laid on the back of the patchwork and cut to size.


I'd bought a cheap fleece in duck egg blue to go on the back, on top of the wadding. As you can see the project got a bit trickier as the blanket got bigger as it only just fit in the space between our sofa and our tv.


I joined the three layers together by sewing edge pieces all the way round. Luckily I had enough purple fabric to make the edges. Things got a little bit wonky here but for a first attempt I think I did pretty well.


Because of the wadding and the fleece this blanket is super warm and cosy, and I love the colours.

I've still got some wadding left so maybe I'll make another patchwork blanket. I'll have to wait for the next school holidays as it is pretty time consuming. Maybe I'll even attempt English paper piecing for the next one!

Wednesday, 21 September 2016

Fabric Christmas Birds

Ever since I picked up some great Christmas fabric from the Scrap Store I've had the idea to make some little birds using it.

I looked through a lot of patterns online but nothing was quite what I had in mind to make a robin so I adapted this pattern from Hobbycraft. I added a different beak and used white felt at the bottom, as well as the Christmas fabric. The bit around the beak was a bit fiddly to sew so I tried a different version.

This time I pretty much stuck to the original pattern, sewing the beak as part of the main structure. It was definitely simpler to sew but I think I'll have to call it a Christmas bird, rather than a robin as it's missing some of the features.

 I then tried a version where the patterned part is wider so there's more colour on the bird, but I think it looks a little too dumpy.

What to you think of the three variations? Are there any other ways I could adapt them? I haven't added wings so maybe that's something I could do.

Wednesday, 29 July 2015

Draw-String Bags


As it is now the summer holidays I finally have time to make something out of this fabric my Mum found at her school. She had the idea to make draw-string bags to sell at craft fairs.

We worked on these bags together, sharing the production. Yay group projects!

Each bag has a lining to match the outside fabric.

Some have this nylon cord for the straps which we had to melt the ends of to stop it fraying. That was fun.

Others have straps made out of the same fabric as the bag. Turning those longs tubes of fabric right-side out was not fun.

We still have a lot more fabric so I think production will continue throughout the summer.


Thursday, 10 April 2014

Bows

I was recently in the bow making mood and created these three.

The fabric I used came from the Scrap Store and they really were small scraps. Just enough to make the bows.

 I've made them into hair clips with a simple barrette style clip attached on the back. 
   At the moment only the flowery one is for sale on Etsy as I didn't get round to taking photos of the other two in use before I got my hair cut. Now I'll have to wait until my sister or a long-haired friend is round.
Doh!

Which fabric is your favourite?

Friday, 9 December 2011

Fabric covered bottle cap

Behold; the fabric covered bottle top.

It's a like a fabric covered button but a lot cheaper to make. Cheaper as in free, as long as you have bottle caps and fabric that is.

I saw the idea on Sew Take A Hike.
The fabric covered bottle caps there were used to make a trivet, but I have no need for a trivet in my life.

So I added one to a yo-yo which could easily become a brooch or a hair clip.

And I put some on a hair band.

(Fun fact; two of the fabrics used in this post came from the bottom of dresses that I had shortened.)

Any other ideas for what I can use these fabric covered bottle caps for? Because they're so easy to make.

Monday, 11 April 2011

Bargain time #3

I'm back home for the Easter holidays and on Saturday I hit up a jumble sale with my Mum and scored this lot.


This bunch of fabric for 40p.
40p!
The mint green polka dot and that funky brown stuff are my favourites. 
I'm thinking bows. Lots and lots of bows.

I also got Buckaroo for 20p to join my 99p Kerplunk from Oxfam. Oh yes.

In other news I finally updated my Etsy shop.
Check it out!

Related Posts Plugin for WordPress, Blogger...