home aboutme myart books shop
Showing posts with label sculpey. Show all posts

Tuesday, 26 January 2021

Baby Yoda Pencil Topper

I recently finished watching the second season of the Mandalorian so wanted to make a mini Baby Yoda, a bit like the Groot ones I made a few years ago. To give the model a purpose I made in into a pencil topper!

I started by making a wire maquette which I wrapped in foil, to save on how much Sculpey I would need to use.

Then I covered it in Sculpey and sculpted it into Baby Yoda.

Once I'd baked the Sculpey I painted the model using acrylic paint. I left the body blank as I was going to cover this with fabric to make his little coat.

I used felt for his coat, which I glued to the Sculpey, and strips of fleece for the trim.

Super cute right??


Check out the video below to see the whole process of how I made it


Tuesday, 13 June 2017

Deadpool Figurine


I really enjoyed making my Groot figures so I decided to make some more characters. Since the original template for the wire armature is for a person I thought I'd do a human figure and since Deadpool is a favourite in my house I gave him a go,


This is the wire armature made using this method. I covered it in Sculpey and started modelling. It was a lot trickier to get a good shape compared with making the Groots. In fact I thought about giving up about 5 times in the first 15 minutes, but I perservered!

 It was quite fiddly with all the different straps and pouches, and one of his guns broke and had to be glued back together. But in spite of that I think the finished product looks pretty cool.
 
Pin it!

Thursday, 1 June 2017

Sweet Treat Charms

I was looking through my old posts recently and was reminded about the miniature food made out of salt dough. It was a really fun project so I decided to try a similar thing using polymer clay. 

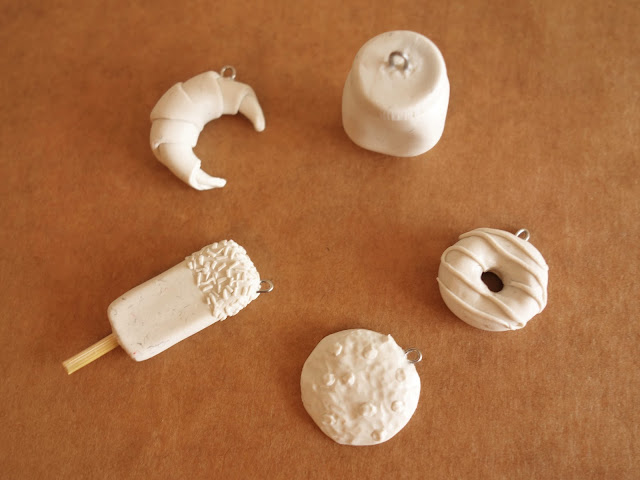
I got out my Sculpey and started modelling. This time around I decided to make the mini snacks into charms by inserting a small pin bent into a loop which could later have a jump ring attached to it.

These are the tools I used with the Sculpey. There's a craft knife, a 'pokey tool' (that was genuinely the name on the packet), and some dotting tools that were sold as nail art tools but work great for modelling.

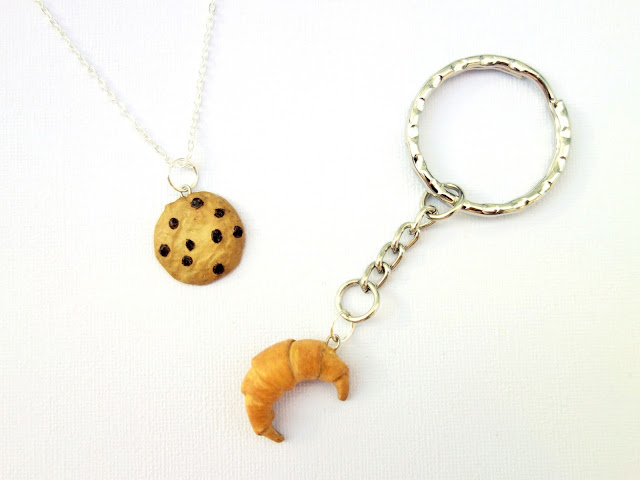
After the charms had their time in the oven it was time to paint them. I used acrylic paint and my smallest paint brushes. 

With a jump ring attached these charms could become a necklace, a key ring or even part of a delicious foods themed charm bracelet.

 I think these turned out really cute and I'm already thinking what other sweet treats I could make in miniature. Any suggestions?

Tuesday, 23 May 2017

Baby Groot Figurine


Have you seen the new Guardians of the Galaxy film? It's awesome. One of my favourite parts is when the now tiny Groot is dancing around at the begining. What a cutie. He's a funny little character that I've decided to immortalize in Sculpey.

I started by making an armature out of garden wire and card. I made a template by tracing the dimensions from a photo from the film that I'd enlarged to the size I wanted the figure to be. I made the armature using this technique I learnt at a model making course.

Then I started covering the armature in Sculpey. I decided to form the head around a ball of foil so that the Sculpey was roughly the same thickness all over. Without the foil the head would have been way thicker than the rest of the body.


Once I had the shape of the body I added the details. This mostly involved rolling tiny bits of Sculpey and attaching them to the body to look 'branchy'. I also added a bark texture using a craft knife and other modelling tools.
I wanted the model to stand up on it's own so I had to make the legs a little wider, but I don't think they look too out of proportion. Since you can't tell from the photo, the figure is about 3 inches tall.

After I'd baked the figure in the oven I painted it with acrylic paint. I started by going all over with one colour, making sure to get in all the little bits with a small brush.


I couldn't stop at just one Groot so I also made a model from the bit in the film when he's sitting in the space ship eating candy.


I think I like this one better as the proportions are more accurate and I got to show more expression.

These were so fun to make I'm tempted to make ones for all his dance moves!

Wednesday, 21 October 2015

Miniature Zombie


This is something I've been making at work. A zombie student!
It'll be part of a workshop I'm running in a few weeks.

I used this method to make the figure, which I learnt at the scale model making course I did at Central Saint Martins a few years ago.


I used white Sculpey and built up the body in layers, using a heat gun to harden it. Then I painted the figure with acrylic paint.
Making the zombie look gross was really fun and I hope the students enjoy making theirs.

Tuesday, 30 June 2015

Nail Varnish Marbled Pendants

So we've all seen the marbled nail varnish technique by now, right?
Well I wondered what else I could use the technique on and I decided on necklace pendants.

I started by making and baking some rough pendant shapes from white Sculpey.
Then I picked out some nail varnish colours and dropped them on to the water.

I gently dropped the Sculpey pendants into the water, scooped up the excess nail varnish, then picked out the pendant.
I inadvertently decorated my finger nails at the same time. I think I should have remembered the Vaseline trick.

After I'd sprayed the nail varnish with a coat of clear varnish I painted the edge of the Sculpey piece  with silver  acrylic paint. Then I drilled a hole in the top of the pendants and attached a jump rings and chain.

I also made a gold version with green and gold nail varnish.

What do you think?

Pin it!


Thursday, 28 May 2015

Stamped Ring Dish

This ring dish is similar to the little Sculpey dishes I made a while back, but it gave me a chance  to use my new letter stamps.

These letter stamps were actually sold as cookie stamps along with a recipe book. They were on sale in The Works just after Christmas and I had crafting in mind when I bought them. The stamps came with a little holder that you slide the letters on to make a word but it's...er...somewhere in my room...

I made the dish by rolling out white Sculpey (note to self: get an actual rolling pin instead of using my can of spray mount) and cutting out a circle and moulding up the sides. Then I used the letter stamps to spell out 'rings and things'. I think it looked best when I pushed the letters in quite far.

Once I'd baked the Sculpey and it had cooled I sprayed it gold. 

I decided to fill in the letters to make them stand out. I used watered down black acrylic paint and the tiniest brush I have, which was actually sold as a nail brush. I used watery paint as I still wanted to see some of the shine from the gold, and also it was easy to wipe away any paint that got on to the main part of the dish. 

After a spray of varnish the dish was finished. I'm really happy with how it turned out and want to make more.

What other things could I spell out with the stamps?

Pin it!

Tuesday, 22 April 2014

Sculpey Print Dishes

On my last trip to the Scrap Store I picked up these rubber stamps and had the idea to use them to imprint into Sclupey.

I rolled out a piece of Sculpey into a rough circle and pressed the stamp into it. I had thought about glueing the stamps onto a wooden block, like they're supposed to be, but the flexibility of the stamps on their own was useful for this project. 

I curved the Sculpey circle into a shallow dish and baked it following the instructions.

To decorate the dishes I started by painting the whole thing in one colours using a paintbrush. Once this was dry I went over it with a light tone of the colour using a sponge so the dark colour would show through.

Once all the paint was dry I sprayed the dishes with a couple of coats of clear varnish.


Thursday, 31 October 2013

Gingerbread Men Ornaments

It might be a little bit too early to be thinking about Christmas, but I've got some Christmas craft fairs coming up so I need to think ahead.

In addition to the things I make for Etsy, I've been adding to my stock with some seasonal items.

This gingerbread man ornaments is made out of Sculpey - a flat base with the features added on - and then painted with acrylic.

I also made some smaller gingerbread men.
Gingerbros, if you will.

For these I painted on the features, using the tiniest brush, instead of making the bits with Sculpey first, as I thought that would get a bit fiddly.

I love how these turned out and I'm looking forward to seeing what people think of them [whether they buy them or not!]
My first craft fair of the season is this Saturday.
For anyone local reading pop down to the Letchworth Settlement between 10:00 and 4:00 for the Garden House Hospice Arts, Craft & Design Fair.

Related Posts Plugin for WordPress, Blogger...