home aboutme myart books shop
Showing posts with label craft. Show all posts

Tuesday, 26 January 2021

Baby Yoda Pencil Topper

I recently finished watching the second season of the Mandalorian so wanted to make a mini Baby Yoda, a bit like the Groot ones I made a few years ago. To give the model a purpose I made in into a pencil topper!

I started by making a wire maquette which I wrapped in foil, to save on how much Sculpey I would need to use.

Then I covered it in Sculpey and sculpted it into Baby Yoda.

Once I'd baked the Sculpey I painted the model using acrylic paint. I left the body blank as I was going to cover this with fabric to make his little coat.

I used felt for his coat, which I glued to the Sculpey, and strips of fleece for the trim.

Super cute right??


Check out the video below to see the whole process of how I made it


Wednesday, 23 September 2020

Handmade Baskets

Today I'm sharing how I made baskets out of newspaper. Legit baskets! Out of paper!
I'd seen this project a long time ago on Pinterest and lockdown finally gave me the opportunity to try it out.

I looked at a few different tutorials and I suggest you do the same if you want expert advice! This is the tutorial that I followed. It's just pictures so there were some bits I had to figured out for myself.

I started by ripping sheets of newspaper in half along the long side, and then rolling them at an angle into long tubes, secured with a bit of Pritt stick at the ends. One end will be wider than the other and that's meant to happen and will be useful later.

Once you have a bunch of tubes you need to sandwich them between two pieces of cardboard with a lot of PVA glue, which will be the base of the basket. You need an odd number of tubes +1 around the edge so the weaving works. I learnt this by having an even number in my first attempt which messed up my over/unders. The +1 is the tube you start off weaving with.

Once the glue is dry fold the tubes up and secure them to a box with pegs. It helps to choose your box first and then cut the cardboard bases to fit it.

Then get your weave on, starting with the extra tube you stuck in the base. When the tube you're weaving with gets too short, stick the thin end of a new tube into the end of the first tube.

When you've reached your desired height, fold and tuck the ends of the tubes in a way that I can't explain but you might be able to see in the picture. Now would be a good time to check those other tutorials online.

Then there's some more folding and tucking to finish the top.

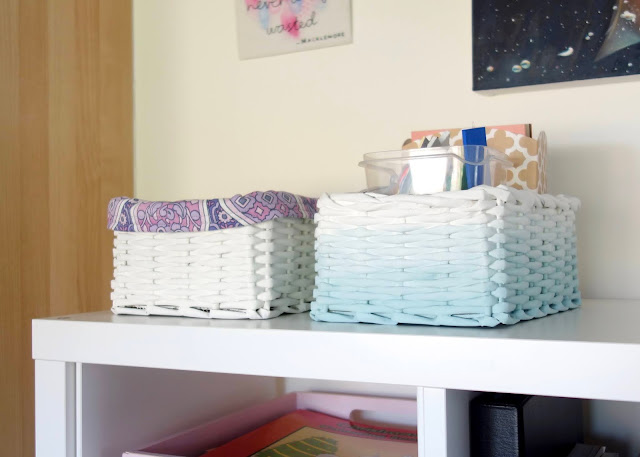
I then painted my baskets white with house hold emulsion, but most paints will do; acrylic, pre-mixed bottle paint etc.

I decorated one of my baskets by painting a gradient/ombre effect using turquoise paint mixed with different amounts of white.

For the other basket I managed to sew a lining which fits inside.

And that's it! I now consider myself a basketeer!

I can't wait to make more in all different shapes and sizes. I never need to buy a basket again! 

Sunday, 9 February 2020

Felt Dog Notebooks

Remember the handmade notebooks I made? Well I've made some more, but this time with felt dog faces on the front. At this stage, I think if you stood still for too long in my craft room I'd try to sew a dog face to you!

For this set of notebooks I used plain white paper for the pages, from unused sketchbooks, rather than different coloured paper like in my first set. I like the mix of papers but some of the feedback I got from having those notebooks out at craft fairs was that some people prefer plain paper. So I'm giving the people what they want!

Each notebook has 48 pages which are sewn together down the middle and attached to a card cover, which is covered in patterned fabric. I love a reason to dig into my fabric stash.

 I've listed the notebooks in my Etsy shop so if you're interested, check them out here.


Monday, 22 July 2019

Hen Do Craft Activity

This past Saturday was my hen do! I wanted it to be a low-key, home made kind of affair so we went out for brunch, played some games, made pizzas and did a craft activity. Because it wouldn't be my hen do without a craft activity!

A few weeks before, my sisters and I were out shopping when we found a bunch of these white pleather jackets in a charity shop. I didn't want sashes or cheesy t-shirts for the hen do but I agreed to everyone having these bizarre jackets. They were only £3 each and I can't say no to a bargain!

I organised the craft activity for the day. I kept it simple by going with 'decorate your own make up bag'. I bought a pack of 10 canvas make up bags from Amazon and then raided my craft room for supplies. Apart from the bags I didn't have to buy a single thing. I just have that much craft stuff!
The supplies included; fabric paints and pens, fabric, ribbon, sewing cotton, buttons, beads, Sharpies, sequins, fabric stars and flowers, leather pieces, and googly eyes. I laid everything out on a table at one end of the room and let people rummage through.
I also printed out a few inspiration images to get people started.

The good thing about this activity is that it didn't require a teacher, which would have been me, to walk everyone through it. I just introduced the craft and then we all got on with it, which meant I could take part too.

This is what everyone came up with! I love how they're all so different, and how everyone got involved with the activity even though they're not as in to crafting as I am.
I would definitely recommend this kind of activity for a girly gathering. Just provide some drinks and snacks and you're go to go!

Tuesday, 23 May 2017

Baby Groot Figurine


Have you seen the new Guardians of the Galaxy film? It's awesome. One of my favourite parts is when the now tiny Groot is dancing around at the begining. What a cutie. He's a funny little character that I've decided to immortalize in Sculpey.

I started by making an armature out of garden wire and card. I made a template by tracing the dimensions from a photo from the film that I'd enlarged to the size I wanted the figure to be. I made the armature using this technique I learnt at a model making course.

Then I started covering the armature in Sculpey. I decided to form the head around a ball of foil so that the Sculpey was roughly the same thickness all over. Without the foil the head would have been way thicker than the rest of the body.


Once I had the shape of the body I added the details. This mostly involved rolling tiny bits of Sculpey and attaching them to the body to look 'branchy'. I also added a bark texture using a craft knife and other modelling tools.
I wanted the model to stand up on it's own so I had to make the legs a little wider, but I don't think they look too out of proportion. Since you can't tell from the photo, the figure is about 3 inches tall.

After I'd baked the figure in the oven I painted it with acrylic paint. I started by going all over with one colour, making sure to get in all the little bits with a small brush.


I couldn't stop at just one Groot so I also made a model from the bit in the film when he's sitting in the space ship eating candy.


I think I like this one better as the proportions are more accurate and I got to show more expression.

These were so fun to make I'm tempted to make ones for all his dance moves!

Wednesday, 7 December 2011

Craft Books I'm Loving

This term I've really been loving on my university's library.
I've been there more times in the last few months than I have in the whole two years previous. Not only that, but I've taken books out. Multiple books at multiple times. And read them.
This was mostly due to my dissertation but then I stumbled upon the craft section and decided to take a couple of books out for recreational use. Shocking, I know.

I don't really like how-to books because I prefer to figure stuff out myself or just get tutorials off the internet, so the following books are more focused on the artists/crafters themselves and their practices.


A couple of artists I wanted to share from Indie Craft are;


Diem Chau embroiders on silk which is then adhered to crockery to make it look like it's sewn porcelain.


If you know my art work then you know I'm into cute/creepy so I love the crocheted work of Patricia Waller.


Cross-stitch on a car! That's just cool.
Severija drills holes in all sorts of metal to cross-stitch.

And Handmade Nation has lots of photos of studios/craft spaces which I always like to see.

I found it really inspiring reading through these books and I made sure I had a notebook handy because lots of ideas came to me which I'm hoping to work on during the Christmas holiday.

Sunday, 4 September 2011

Craft fair

Yesterday I had a table at a little, very little, craft fair at my local mill.
You know the one; where I held those craft sessions.

And because of those sessions I didn't have to pay any commission on the things I sold (the table was already free) because I'd already given enough in terms of my time.
Win for volunteering! 


As well as selling my crafty accessories (which you'll soon see on my Etsy again once I get around to renewing) I also had a few little paintings, cards of my paintings, and bigger paintings for sale.

I didn't sell that much, but lack of commission meant I came away with a profit, and it was a good chance to perfect my stall layout for future endeavours and have a good chat with my friend Stef who was helping me out.

Sunday, 5 June 2011

Craft Swap

I got my things from the craft swap organised by Kelsey at Artichoke Designs in the mail!

They came all the way from Sweden from Lady Night.
They were each individually wrapped and the sweet note was on fancy paper. It was so lovely.


I got a pretty knitted ring, a pink bracelet and a cute little bunny brooch.
I love them, thanks Lady Night!

Taking part in the swap was fun and it was nice to connect with other crafters all over the world.
Also, it's nice to receive mail!

Speaking of; I also received this which means they got my hair!

Monday, 30 May 2011

Tiger time

I made this tiger yo-yo (by tracing a photo of a tiger with a Sharpie) but now I don't know what to do with it.

I could make it into a hairband...


...or a brooch.

I'm not sure, any ideas?

Monday, 9 May 2011

Craft-Arty Donuts

My friend had the idea for me to make a box to display my felt keyring donuts in. So I did!

I think they look pretty awesome.


And don't forget some of these are available to buy in my Etsy shop here, here, or here.

Also, this month I am sponsoring Wild Olive so go and check out that great blog. Tomorrow she's having a little question time. Fun fun.

Wednesday, 27 April 2011

Sha!

I really like the look of words made out of wire so I decided to make a necklace using that idea.
I got some garden wire, tackled it into shape, and then very carefully wrapped shiny thread around it.

Necklaces like this typically spell out someones name or the word 'love'. Did I do that? Oh no.

I went for the word 'sha'. If that can be considered a word.

Why sha? Just listen to the beginning of this song.


Now, I'm not completely mad for Miley, but this song happens to be my ringtone.
And I've been known to sign off emails and texts with 'sha'.

Are there any words that you use out of context, youknow, for funsies?

I was really happy with the way the necklace turned out so I made more and put them on my Etsy.

Yes I am one of those annoying people who says 'lol' out loud, but I don't intend to change!
This necklace, 'The Golden Lol', got snatched up within a few hours of me listing it.
It's the first thing I've sold on Etsy! So exciting.

This necklace is still available though. Check it out.
I like to mix things up with my greetings instead of sticking with 'hello'. I go for 'ahoy', 'aloha' even a friendly 'whaddup'. 

Related Posts Plugin for WordPress, Blogger...