home aboutme myart books shop
Showing posts with label notebook. Show all posts

Sunday, 9 February 2020

Felt Dog Notebooks

Remember the handmade notebooks I made? Well I've made some more, but this time with felt dog faces on the front. At this stage, I think if you stood still for too long in my craft room I'd try to sew a dog face to you!

For this set of notebooks I used plain white paper for the pages, from unused sketchbooks, rather than different coloured paper like in my first set. I like the mix of papers but some of the feedback I got from having those notebooks out at craft fairs was that some people prefer plain paper. So I'm giving the people what they want!

Each notebook has 48 pages which are sewn together down the middle and attached to a card cover, which is covered in patterned fabric. I love a reason to dig into my fabric stash.

 I've listed the notebooks in my Etsy shop so if you're interested, check them out here.


Friday, 8 March 2019

Handmade Sketchbooks

Every time I see a post on book binding or handmade notebooks I always feel really inspired. I finally put the project on my to do list and this is what I came up with.

I really wanted my books to have a mix of papers to make things more interesting, and each one unique. I started by going through my over flowing drawers of paper and picking out pieces to use as the pages. I've got cartridge paper, lined paper, coloured paper, squared paper, sugar paper, patterned paper, tracing paper and more.

I cut all the paper into A5 sized pieces and then folded them in half to A6 size. My tip for doing this is to fold them against a stack of post-its so the edges are alligned. It doesn't have to be post-its though, anything with a raised, flat edge will do, eg, a book, a box.

I then cut some card for the covers. I made them a millimetre or two bigger than the pages. I used Amazon cardboard envelopes which I have a fair few of as I love the quality of the card.
I arranged all my pages into books, making sure to have a good mix of all the different types of paper.
In my first attempt I used staples to attach the pages together but I didn't love how it turned out, so I tried sewing the pages together.

I started by marking four dots, about 3cm apart, along the fold of the centre page. Then I took a drawing pin and pierced four holes through the whole stack of papers. You can't see from the photo, but I had a lump of blue-tack on the other side of the paper so the pin had someting to go in to instead of my table top. I put a scrap piece of paper over the blue-tack so that it didn't stick to my book pages.
I then used one of the pages as a guide to pierce holes in the cardboard cover.

Then I used cream coloured sewing thread, doubled up, to sew the pages and the cover together. I arranged it so the knot would be between the last page and the cover as this would be covered up later.

Next I covered the card cover with something a bit more attractive. This was a chance for me to use some of the really colourful fabric I have in my stash.
I cut the fabric about an inch bigger than the card cover and cut the corners off. I used PVA glue to stick the fabric to the cover, one side at a time.

I then glued the first and last pages to the inside of the cover to cover up the edges of the fabric. This is also how the knot gets covered up.

The last thing to do was trim the pages so they all appear the same size when the book is closed. 

And before I knew it, I'd made all of these!

I really enjoyed making these books. I love the mix of pages. Much more interesting than page after page of blank white.

I hope I've explained my process well enough. Let me know if you have any questions!


Thursday, 30 October 2014

Memento Notebook

A while ago I was looking through my folder of stuff I collected during my holiday in Nashville a couple of years ago, and thought there must be a way to display this stuff instead of keeping it hidden away.

I laid out all the stuff to take a photo. There's things like the guitar magnet I bought, my Opry backstage tour pass, ticket to the Adventure Science Centre, a serviette from the Country Music Hall of Fame, a bus route map. I also added a couple of photos from the trip.

I cropped the photo and adjusted the colours and came up with this.
Cool, but now what?
I put the photo on Facebook to show my sister, who I took the trip with, and she made it her cover photo.

(I forgot to take a photo before I gave it to my sister so had to get her to send me one)
When I was thinking what to get my sister for her birthday a few weeks ago I went on to her Facebook page to get inspiration, When I saw the Nashville photo I had the idea to get it printed as a notebook cover.

I used Photobox to get it printed and the photo came out great, and my sister loved the gift.

This was a great way to display mementos from a trip, especially ones that you can't really stick in a scrapbook. I think the image would also look good as a poster or canvas print displayed on the wall.

Tuesday, 15 January 2013

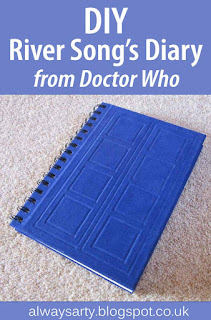
River Song's Diary

My sister loves Doctor Who so I made her a 'River Song's Diary' for Christmas.
I saw lots of peoples attempts on the internet, but this is how I decided to make mine.

I started by removing the covers of an A5 sketchbook, bought from The Works.
I cut out the Tardis squares from card and glued them to the covers.

I covered the card with sticky-back blue material and used a hair grip to push it in the grooves and bring out the detail.

I used a craft knife to uncover the holes in the covers and then I put them back on the wire spiral to reassemble the book.
Some people then distress their book to match the original one from the show, but I figure that'll happen over time.

My sister loved it, and she assumed I'd bought it, she thought it was that good.

Pin it!

Related Posts Plugin for WordPress, Blogger...