home aboutme myart books shop
Showing posts with label christmas decorations. Show all posts

Monday, 11 November 2024

French Knitting Christmas Decorations + video

I've been having a lot of fun experimenting with my French knitting machine and it was about time I made some Christmas decorations using it! So here are 5 decorations that I came up with using French knitting.

The first decoration is a super simple one. I made a red and a white piece of French knitting, put wire in them and then twisted them together. I sewed the two ends together and there we go - a cute candy cane.


Next up I made a snowman. I wrapped a long length of white French knitting around a plastic bauble, and then attached ear muffs made of red French knitting, and then added the facial features. This method of wrapping the French knitting around a bauble can be used as the base to make lots of different characters and designs.

This Rudolph has a more minimalist design and is pretty easy to make. There's wire through the circle and the antlers, and everything is sewn together. 

This little wreath was made by threading beads on the wool before making the French knitting and sending them through the machine one by one. I made two strands in this way which I then wrapped together. I added a matching bow made of ribbon for a finishing touch.

This angel features light up wings which I made by threading a small string of led lights through the French knitting. I hid the battery pack in the body which I made by wrapping the wired French knitting around a cone. I used a bead for the head, wool for the hair, and a tinsel pipe cleaner for the halo.

Check out the video below for a more detailed look at how I made these decorations.

Saturday, 19 December 2020

Christmas Canvas Banner


This Christmas banner is another craft project that I completed during the first lockdown. I often get ideas for Christmas projects during the Christmas period, by which point I'm too busy with my Etsy shop to make them happen. So I made use of all the time at home earlier in the year to make some of these Christmas ideas. 

I started by cutting out two banner shapes from canvas and drawing a circle on one of them.

I used my Cricut to cut out holly leaf shapes from different shades of green felt. Then I sewed them around the circle on the canvas.

I printed out a 'Merry Christmas' template and sewed over it with red embroidery thread. Then I tore away the paper when it was finished.

I forgot the take photos of the final stages! Oops!
I sewed the two canvas pieces together, right sides in, then turned them right sides out. Then I folded the top over, enough for a wooden dowel to fit through, and sewed that in place.

I also added some red pom poms on the front as holly berries.

Then I added some ribbon so the banner could be hung.

It turned out so good! Hopefully next year Christmas craft fairs will be back and I can find a home for it.

Sunday, 15 November 2020

Crochet Baubles

One of the things I spent lockdown (the first one...) doing is building up my stock of these crocheted baubles. 

I had bought a big box of red and white baubles in the January sales from Poundstretcher which were perfect for these decorations.

The first stage was to paint the baubles a base colour so the original colour wouldn't show through any gaps in the crochet.

As you know, my Mum is the crochet wizard, not me, so during a doorstep drop off of some groceries to my parents I handed over a box of painted baubles with drawings of extra pieces I needed like ears and scarves. Then a couple of weeks later I picked them up; all crocheted and ready to decorate. Probably in exchange for some bread flour or yeast that I'd managed to get hold of.


Most of my designs were straight up Christmassy - Rudolph, Christmas pudding, Elf etc - but I also tried some other things like these animals. They were all made by cutting out felt pieces which I sewed to the wool.

My favourite design is this BB8. It took a lot longer than the others but I think it looks awesome. I must try making a Yoda next...

Friday, 6 November 2020

3 Ways to Decorate Wood Slice Ornaments

Today I'm sharing three ways to decorate wood slices to make Christmas ornaments.

First up is an old favourite; painting a winter scene. I've made many decorations this way which you can see here. I just search 'winter scene' into Google to find pictures for inspiration and then get to work with acrylic paints.


Next up I went for some word art. I used black ready mixed paint on the background, which allowed the wood grain to show through, and then used a gold Sharpie for the words. Watch the video below to see how I got the writing so neat!


For the third design I made an image transfer using a gel medium and a photo from my wedding. Any excuse to use those photos!

Check out the video below for a detailed how-to of how I made these ornaments.


Tuesday, 11 December 2018

Crochet Unicorn Ornament

It doesn't look like the unicorn trend is going away any time soon so I'm fully embracing it with my craft fair offerings. I have unicorn hairbands, unicorn pencil toppers, unicorn toys and now unicorn baubles.


When my Mum was crocheting the baubles for my Mickey Mouse ornaments I asked her to do a few white ones.

I made the horn and ears out of felt which I sewed to the wool.

I used some little fabric flowers to embellish the unicorns and added the eye lashes with black embroidery thread.


Tuesday, 5 December 2017

Ribbon Hearts

I bought this pack of white wooden hearts from a charity shop for 50p a while back, and they've since been waiting in a drawer for inspiration. The inspiration came during the summer when I was in a seaside shop that had a Christmas section (I totally don't mind looking at Christmas decorations in August). There was a stripey patterned heart decoration that caught my eye and gave me an idea. The pattern on the heart in the shop was printed on but I thought I could achieve a similar look with ribbons.

I picked out all the Christmas ribbon I have in my stash and any other colours that would match. I coated the wooden hearts in PVA glue and laid the ribbons across it.

Once the glue was dry I trimmed the ribbon. I sealed the edges with some more glue to stop the ribbon from fraying.

 Then I made a hole in the top and put some shiny red thread through. 


These were really simple to make and a great way to use some of my ribbon stash.

Wednesday, 15 November 2017

Felt Woodland Decorations

Felt seems to be my go-to material for making decorations. My felt dogs have been doing really well so my boyfriend suggested I try making some different animals. 

I decided to start with a fox because the woodland theme is quite popular. I went for a simple style and am really pleased with how it turned out.

Next, for something a bit more festive I made a reindeer. I wanted it to match the fox so I refrained from adding a red pom-pom nose!

Then, for something even more festive I made a cute little felt Santa! There are lots of elements to this pattern so it was a bit fiddly to put together but I love the end result.

What cute little character should I make next?

Sunday, 22 October 2017

Painted Wood Slice Christmas Decorations

I've wanted to make these decoration for a while but only just got round to buying some wood slices. I really like the painted baubles I've done so I thought the same sort of paintings on wood slices would work really well as Christmas decorations.

 I bought a pack of 20 wood slices from Ebay and prepared them by painting a coat of primer and drilling a hole in the top so they would be able to be hung.

 I used acrylic paint and tiny brushes to create these little winter scenes.

 I also tried some other images which I think look good too.

I've added a few of these decorations to my Etsy shop along with some other new makes.

Thursday, 24 November 2016

Gingerbread House Ornament


I tried making a mini gingerbread house ornament a few years ago but I didn't like the way it looked. Since then I've come up with a better way to do it, which I'm going to share.


 I started the same way, cutting all the sides of the house out of my card of choice; Amazon packaging. Then I glued all the bits together.


 Next I needed to paint the house a gingerbready colour using acrylic paint.

 Here comes the game changer. Using the same polyfiller and water mix in a bottle with small nozzle that I used here I was able to be more precise with the piping of the 'icing'.

Not too bad if I say so myself! I could see myself getting a little production line going and making a whole bunch of these.

Tuesday, 15 November 2016

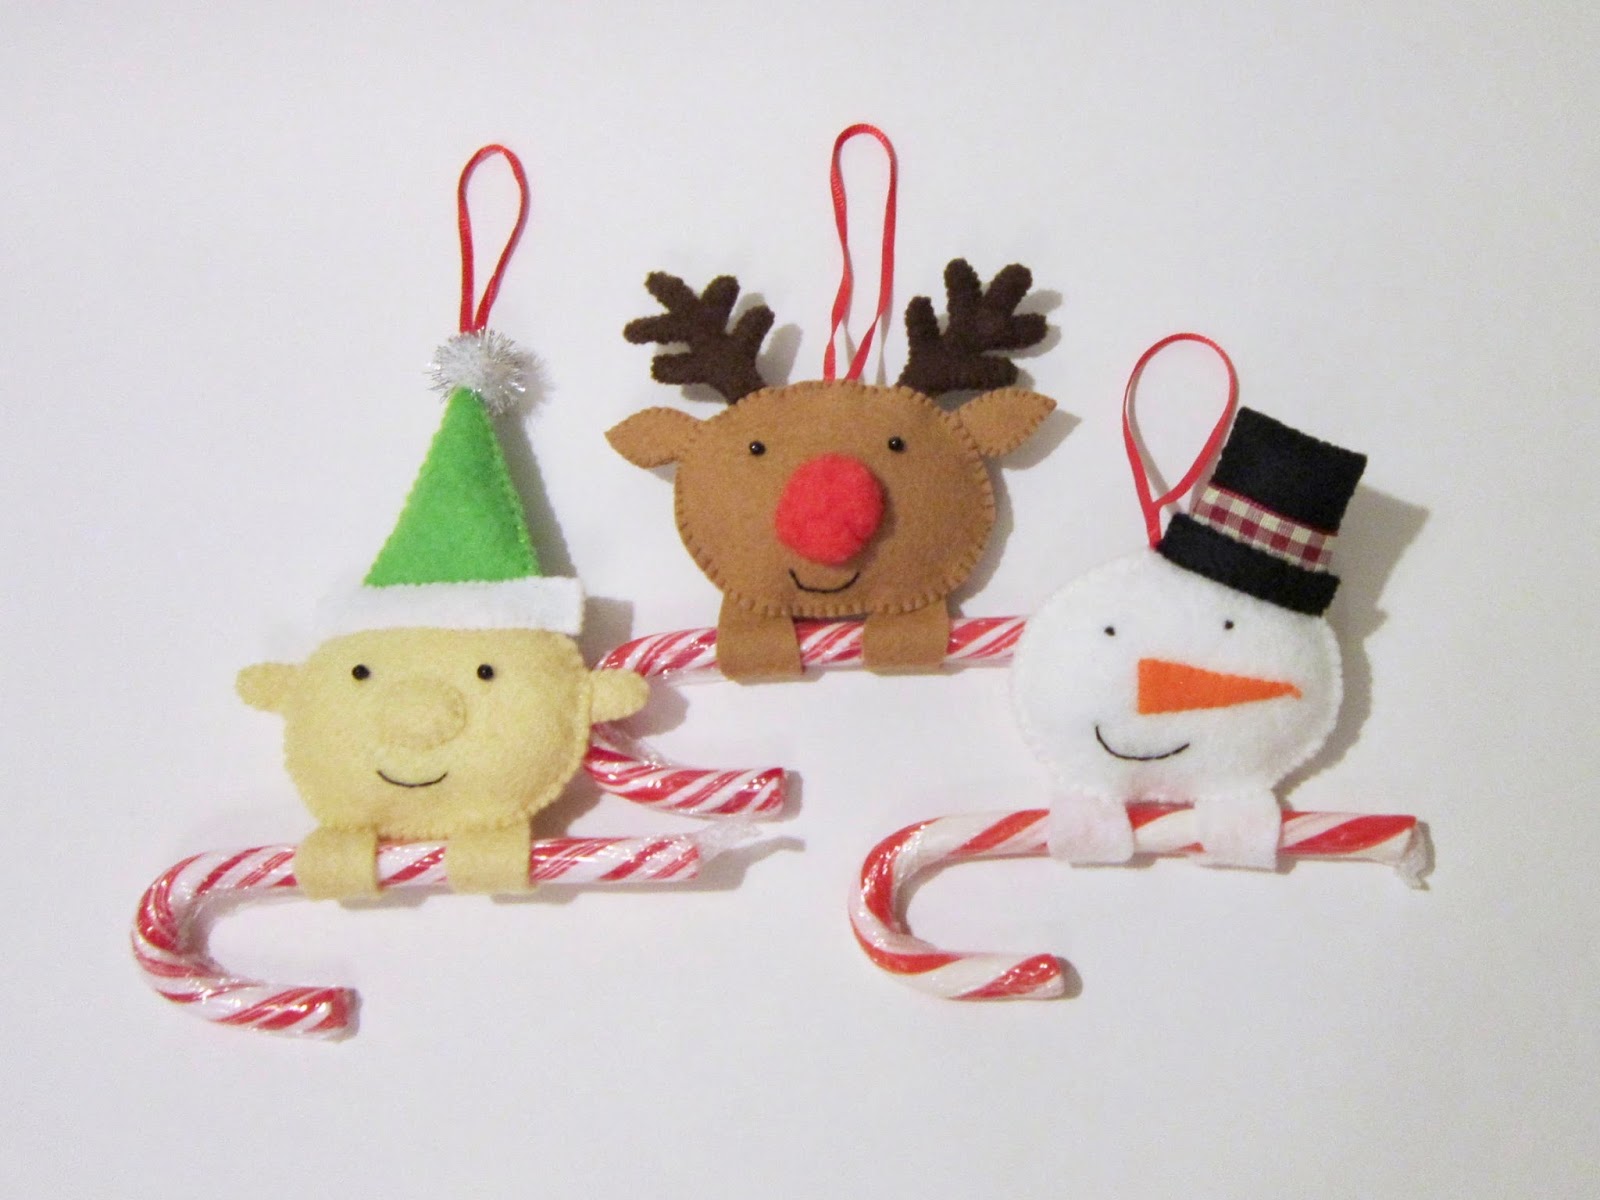
Candy Cane Holders

Since I have a lot of candy canes around from the candy cane horses I thought I'd try and make something else with them. I remembered seeing something on Pinterest where a character is holding the candy cane so I went with that.

These were pretty easy to make. I sewed the face on a piece of felt first, then made the additional parts, like Rudolph's ears and antlers, and then I sewed the two pieces of felt together adding in two loops of felt to be the hands holding the candy cane.

How cute would these little guys be hanging on a Christmas tree?

Wednesday, 9 November 2016

Candy Cane Horses


My Mum saw this idea for candy cane horses on Pinterest.

Their creation is pretty much all down to her. She does the important crocheting and I just stick on the googly eyes and tie on some red ribbon for the reigns.

These sold pretty well at a Christmas craft fair a couple of weeks ago, with one woman saying they were the perfect present for a horse vet she knows.

Wednesday, 2 November 2016

Lolly Stick Sledge

On a recent trip to Harrod's Christmas World I saw some cute little wooden sledge decorations which inspired me to try making my own version.

On several blogs I'd seen that you can bend lollypop sticks by boiling them so I did just that to try and get the curved runners of the sledge.


Once the sticks had boiled for about half and hour and were cool enough to handle, I left them to dry against the fridge weighed down by the toaster and sugar pot to keep the curve. Kitchen resourcefulness!

I cut the other lolly sticks to size with a craft knife and stuck them altogether with E6000 glue, hoping everything would stay at right angles and not fall apart.

Once the glue dried I decided to paint the little sledge so it didn't just look like a bunch of lolly sticks stuck together. 

I thought the sledge might make a great gift with some chocolates tied to the back.

Related Posts Plugin for WordPress, Blogger...