home aboutme myart books shop

Thursday 19 September 2024

Miniature Crafts - Pottery

For my latest attempt at miniaturising crafts I had a go at pottery. I chose to use air dry clay to try and make some tiny pots, and I love the results!
Check out the video at the bottom of the post to see exactly how I made them.


I think this pot is my favourite. It's almost circular with a small opening at the top. I was able to achieve a gold ombre effect with acrylic paint. To make the dried flowers I used bits of potpourri.
 
This plant pot is more classic in shape, but then I painted it with a trendy design, which I sealed with PVA glue to give it a shine.
I made the Monstera leaves out of painted paper and I even added fake soil to the pot, made out of shredded dried bits of paint.

I made this irregular shaped vase with lots of texture on the outside. Then I decorated it with painted flowers and made some paper daffodils to go inside.

For this jug and vase I wanted to experiment with the 'glaze', which I did by applying layers of PVA glue with flecks of chalk and charcoal mixed in. I love the effect and like with real fired pottery you don't know how it's going to look until the end.


I love my collection of miniature pots. Which one is your favourite?

Thursday 12 September 2024

5 Things to do with Wool Scraps

If you're a knitter, crocheter, or make anything with wool, or yarn, then you'll probably find yourself with lots of little bits of wool that you've trimmed off your projects. I've been holding on to these scraps thinking there must be something useful I can do with them, and the following 5 projects are what I came up with.

Check out the video at the end for all the details.

First up is this little bowl. The secret to making a sturdy bowl out of wool is cornflour, or corn starch. Mix it with white glue and water and then dip your scraps into the mixture and wrap them around a balloon. It'll need at least 24 hours to dry, but then you'll be surprised with how solid it becomes.

Next up is a little throwback project. I made a mixed wool pom-pom and then turned it in to this little desk buddy by adding some felt feet and matching googly eyes.

I think this is my favourite use for wool scraps and that is to use them as hair for little dolls. I added my wool to a crocheted head, using a crochet hook, and I think it adds so much character. I broke up the strands of wool to make wavy hair and I love how it looks.

This simple project can use up really short pieces of wool. It's a simple flower where I sewed the pieces of wool to a felt circle and then added a button on top. This could be made into a hair clip or a brooch.

And finally I have this fun lion wall hanging. The pieces of wool are glued between two circles of card, and then I added the lion features made out of paper.


Let me know if you have any other ways of using up scraps of wool. I'd love to hear them!

Friday 30 August 2024

Felt Pizza Kit

My son is very much in his Bluey era and particularly enjoys the Pizza Girls episode, so I thought he would enjoy his own pizza kit to play with. I'd seen some nice homemade ones online made with cardboard, but I thought that all the pieces would just slide around so I went for felt.


I found some thick wadding and cut out a circle from it. I used a paper plate to draw around. Then I cut two circles out of beige felt. Ideally I would have wanted to use a slightly darker coloured felt, but I had a lot of this beige so the pizza base just looks a little under cooked.
I also cut a long strip of the felt which I pinned to the edge of the circle and sewed on, going through all the layers. 


The pizza base turned out a lot better than I was expecting. The thick wadding works really well as it means the base is not too floppy.


Next I headed to my felt stash to work on the pizza toppings. I went with ham, olives, cheese, green peppers, chicken, onions, pepperoni and mushrooms. If you've seen the episode of Bluey you'll know that mushrooms are a must!
I also cut out a wobbly red circle of felt for the tomato sauce. I've seen some people do this for the cheese as well but I went with strips. My son has to have dairy free cheese so his cheese looks more like this as it's terrible at melting!


I wanted to keep all the toppings organised in a container and remembered I had this wooden box with compartments and a lid. I roughly drew all the toppings on my computer and added the names, then printed them out and stuck them in the box with double sided sticky tape.


Everything fits almost perfectly, and I have one space left should I think of anything else. I'd thought about sweetcorn, which my son really likes, but I did not like the idea of tiny yellow squares of felt existing in my house. So that spot is staying empty for now.

Then I went on Canva and designed a menu, which I laminated, and an ingredients label for the box.


This whole project actually started because my Dad was getting rid of a box that was the same size as a pizza box. So I added the logo to that by printing it on sticker paper. All the elements - the pizza, toppings box and menu - fit in this box so it's easy to tidy away.

So far the pizza kit is a hit. Although my son will take our order but then put whatever toppings he wants on anyway. And there's always mushrooms!

Tuesday 25 April 2023

Wood Burned Key Rings

I'm back with another edition of 'what can I do with the pack of 100 keyring chains I ordered?'
This time, we're reaching for the pyrography tool.

I've made some wood burned dog things in the past that turned out well so I thought I'd give them another go. I bought a pack of little wooden discs which may have been a little bit too small but I'm committed now.

I found that using the pyrography tool worked best for long haired, fluffy dogs as it doesn't give enough precision for short haired dogs. I tried a few but wasn't happy with how they turned out, with the exception of the pug. He came out ok, if a little bug-eyed.


Once I'd drawn the dogs I just needed to drill a little hole in the discs and attach the key ring chain, and now they're good to go.

Friday 17 March 2023

My Craft Room

This post is probably a year and a half over due, but everything takes longer with a toddler!
In 2021 we renovated pretty much the whole of the downstairs of our house, including turning the old garage into my new craft room.

The garage was cold and damp. The previous owner of the house had extended it at the back but the new bit of roof leaked and the brickwork was crumbling. Also the electrics didn't work!

Our builders gutted it, rebuilt, insulated and boarded the space, and added two windows and a door so I have a lovely view of our garden. It's also now attached to the house via a utility room so I don't have to go outside to access it. 

This was all going on while I was pregnant and by the time the room was ready to decorate I was very big!  But that didn't stop me from getting on a ladder (very carefully with lots of supervision!) and doing the cutting in. Initially I had wanted the room to be all white but once we'd done the first coat we went a bit snow-blind so I chose to add some colour with this duck egg paint and some simple geometric lines.

This is what my craft room looks like today. Note, I did tidy up especially for these photos. It definitely does not look this tidy all the time!

My 2 metre desk, which I've had since our last house, sits in front of the large window. We actually asked the builders to make the window wider to match my worktop. 
In previous set ups my Circuit machine has had to sit on the desk, which takes up a fair bit of space especially when it's in use, but I was able to repurpose a spare kitchen unit which fits it perfectly. I store my Circuit mats and large piece of paper and canvases in the cupboard.

At the end of the room I have a designated area for product photography. This is another thing that used to have to happen on my desk, meaning I'd have to clear it each time, and I was always having to move around my lights as they got in the way. It is so great having a spot for them which I can leave set up.

I already had a lot of the furniture in this room but I did add a few things, including these three Billy bookcases from Ikea. I wanted all of my supplies to be accessible and on display, as I'll often forgot I have something if I can't see it.

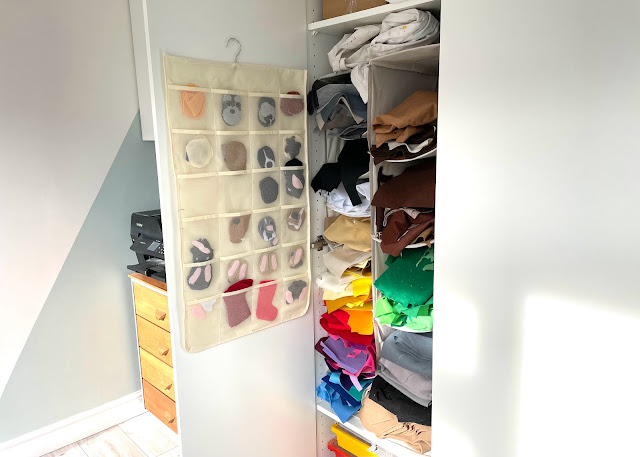
I also ordered an Ikea wardrobe which is mainly used to store all my felt.

I am so lucky to have this space. If my son is asleep then chances are this is where you'll find me.

Friday 3 March 2023

Harry Potter Fabric

A few years ago my sister gave me some scraps of Harry Potter fabric and since then they have just been sitting in my fabric drawers, waiting.

Then this past week I finally dug them out and made something with them!  

Here's what I had to work with. The pieces are very small and some have the house crest very close to the edge. And sorry Hufflepuffs, you don't get represented here. I don't know why there isn't fabric for all four houses, this is just what I was given.


The first thing I made was this Slytherin zipper pouch, as that was the biggest piece I had to work with. I used some black fabric, including some black leatherette, and matching green ribbon.

I then made a Gryffindor pouch but didn't have a strip of the fabric long enough to fill the pouch, so instead I cut out the crest, gave it a felt border and sewed it to some matching red fabric.

With a few more pieces of the fabric I made these hanging decorations. To make these I cut out the shapes using my Cricut and added some iron-on interfacing behind the fabric. Then I sewed the pieces together, adding in these strings of shiny beads.
I could see these hanging on a Harry Potter fan's Christmas tree. It's a shame about that missing Hufflepuff fabric as it would have been nice to make a whole set.

It was great to add a few more items to my craft fair stock using materials that I already had. The various fabrics, zips, felt and embellishments all came from my craft stash, which shows that I should never throw anything away as you never know when it'll come in useful!

Saturday 18 February 2023

Sweet Treat Keyrings

I recently bought a box of 100 key ring chains to start building up my stock. I want to do more craft fairs throughout the year, rather than just Christmas ones, so I need to make more non-Christmas items.

I've made donut keyrings before so I thought I'd continue with that theme and make some other sweet treats. I started with these felt ice lollies, featuring a real lolly stick.

Then I made some ice cream cones. This was a great little project because these treats can really be any colour so it gave me a chance to use some of the other colours in my felt stash, rather than the neutral colours I use all the time for my felt dogs.

For the ice cream cone I added some stitching detail with my sewing machine. I'm really pleased with how that turned out. I also really like this style of decorating with the sequins and beads.


 And finally I made a few cupcake keyrings, decorated with bead sprinkles.

So that used nine of the key ring chains. Now to think of something for the other 91...

Related Posts Plugin for WordPress, Blogger...