home aboutme myart books shop
Showing posts with label tree. Show all posts

Wednesday, 3 June 2015

Wedding Guest Tree

My friend Laura, the one who just got married, wanted a non-traditional guest book for her wedding and had seen the guestbook tree with finger print leaves on the internet. Being her resident arty friend she asked me if I could make one for her.
I googled the idea myself and found I liked the black line, sketchy style better than a painted brown tree. I drew out the tree in pencil first on the canvas Laura had bought, then went over it with a black fine liner. Simples!
I added the couple's names and their wedding date along with a cute little L + C in a heart on the tree.
  
This is how the canvas was displayed at the wedding. We'd taken a trip to Hobbycraft to get the ink pad and found the perfect one. It has five shades of purple on one pad which matched the wedding colours. We also got a couple of Sharpie fine liners for the guests to sign their name on top of their thumb print.

I suggested to Laura that she provided wet wipes so that guests didn't have to walk around with purples thumbs for the rest of the night. She took them out of the packaging and put them in a clear box so they wouldn't detract from the decorations.

This was the tree half way through the night. I didn't get a photo of the finished thing as I was too busy busting my funky moves on the dance floor.

Tuesday, 31 March 2015

Embroidered Tree


When searching Pinterest for embroidery inspiration I came across this example of raised stem stitch, and lots of cool embroideries of trees, so I decided to combine the two and came up with this.


I started by cutting a bunch of strands of something that's stronger than wool but softer than string. I'm not sure what it is. I picked it up at the scrap store.
I pinned the trunk in place then started separating the strands to make the branches. I roughly stitched the main parts in place before covering everything with embroidery thread.


The branches start off as 4 or 5 strands, then separate to 2 strands, then 1. Then each strand divides into 4 separate pieces with make the thin twigs on the end.


This project seemed never ending. In reality I was working on it over 2 weeks.I'm really happy with how it turned out, except now I have no idea what to do with it. Any ideas?

Tuesday, 19 August 2014

Ink Tree

This tree is one of the activities I planned for the children's art workshops I did the week before last. There are three stages to making it.

First I put several blobs of ink (I used sepia calligraphy ink) across the top half of the paper. Then I blew through a plastic straw, spraying the ink upwards in different directions. This makes the branches.

Using a brush I connected all the ink splatters together and painted the tree trunk.

For extra details I used a wooden kebab skewer dipped in ink to draw on to the trunk of the tree.

I also blew the ink to make the tree roots.

I love how this picture is made from just one kind of ink but the different techniques used make it look really varied.

Tuesday, 21 January 2014

Miniature Winter Tree

My Mum got a pair of socks in a plastic bauble for Christmas and I got to have the bauble. I actually got the socks as well because my Mum has the feet of a child.
The bauble opens in two halves which is perfect for putting a miniature something in.
After much thought I settled on trying a simple white winter tree to put inside.

 The tree started as lots of pieces of wire twisted together to make the trunk and branches.

Then I covered wire in Sculpey, baked it, then added a bit more Sculpey in places, and baked again.

The Sculpey right on the ends of the branches was a bit fragile so to fix a few broken twigs I used a technique I learned last year on my Scale Model Making course.
Apply super glue to the join and sprinkle baking powder on it. The glue will dry almost instantaneously and will be bulked out by the now hard powder. This can be sanded down if needed.

I painted the whole thing with white acrylic paint and added glitter.
I may have gone a bit too crazy with the glitter.

Then I stuck the tree over the edge of one half of the bauble using my trusty E6000 and added more glitter around the base.

Now that I now this sort of thing works I can start thinking of other miniature things to put inside. Any suggestions?

Tuesday, 26 March 2013

Scale Model Making

As you may have gathered from previous posts, I recently completed a scale model making short course at Central Saint Martins.
It was really good; the class size was small so we got a lot of attention from the tutor (who is the author of the book I mention way back here), I learnt a lot of new techniques, and one of the guys on the course brought in cakes his wife had made for us! 

The best thing I made was this brick wall.
It's made from Kapa-line foamboard. I've tried a few different methods of making bricks before (here, here and here) but this is by far the easiest and most effective.

As it's foam you can just push into with a pencil and make marks. I also used a wire brush to texture the surface.

On the other side we made an interior wall including door and window frames.
I haven't finished wallpapering it yet, but you get the idea.
This was all made with PVC sheets, another material I'd never used before.

We also had a go at making figures and trees (both unfinished, obvs).
The figure is made of Sculpey around a wire armature.
The tree is made from wire mesh, another kind of foam, and eggshells!

And then there's these chairs that I love.
The larger one is made of the kapa-line foam and has been treated with resin to make it more durable.
I could paint it, but I quite like it the way it is.
The small chair is made of stencil card.
They're both stuck together with super glue (the cheap stuff from Poundland is just as good as the expensive stuff) and yes I almost stuck my fingers together/to my work many times.

It was a great course and I think my art work is really going to benefit from it.

Friday, 29 June 2012

The Degree Show

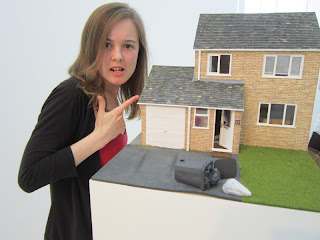
The degree show opened earlier this week and we had the private view on Tuesday.

To see how I made the tree piece click here and here.

And these are the deets for the house; wallsbricksinteriorpavingporchappliancesfront bedroomrubbish binroofback bedroomdetails

Our business cards are all kept together in these specially made pigeon holes.
Here's Natalie modelling mine.

My work seems to be getting a fair bit of attention. I love seeing people walk around the entire house and peer into each window.

And so that you guys don't feel left out, here's a video showing my work so you can view it as if you're there!
(If you're one of my friends or family that are coming to see the show, don't watch this video. Spoilers people!)


The other artist who have work in this room are Clare MillsAndy ReeveJon Jensen, and Will Reid.
Andy has already sold two of his piece. One of them was to John Hurt.
You know, famous actor John Hurt. He's the new provost for our university.
When he looked round he didn't seem to interest by my work, as he was too busy figuring out which of Andy's he was going to buy (the most expensive!).
But his wife had a good look at my work!

If you happen to be in Norwich the degree show is on until Tuesday 3rd July.

Sunday, 22 April 2012

Degree show tree progress

You've seen the tree I'm making for my degree show piece so now I'll show you some progress on the rest of the piece.

The tree slots into a hole in a piece of wood which is attached to a piece of MDF.
The MDF is 45x55cm which is the same size as the top of my plinths.

To make the mound which the tree sits atop a scrunched up newspaper around the block of wood and then papier mached over the whole thing to create a gradual slope. 
Then I put the whole thing in the airing cupboard to dry.

Unfortunately all that water and glue from the papier mache-ing caused the MDF to warp. All four corners were bending upwards.
Mega annoying.
To try and fix this I coated the underside of the MDF with watered down PVA and then balanced it on a roll of masking tape. I put stacks of heavy books on each corner to pull them down.
I did this a few times and it has helped, but it's still not perfect.

I painted the mound first with a mixture of brown paint, glue and dried tea and coffee.
Yummy.

I used this mixture to build up an area around the tree.
Then I painted over some of the brown with green as a base colour for the grass.

For the grass I bought some grass scatter from Ebay from a seller that specialises in model railway supplies.
Up until now I'd managed to avoid using supplies like this, but I couldn't think of an alternative way to make the grass.

Then I started making some tyre tracks.
Stay tuned to find out what that's about.

Friday, 6 April 2012

Degree show tree

In addition to the house I'm making for my degree show, I'm also making a second piece that features a tree.
I've made a tree before and I was pretty proud of it -someone even bought it- which is why I thought I'd be able to successfully make another one.
Confirmation on that statement is still pending.

Here's how it's going so far.

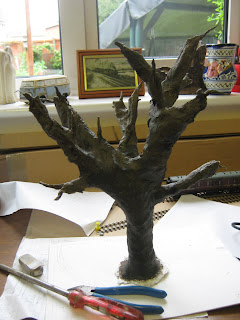
I started with a lot of wire wrapped round a piece of wooden dowel which then branches out into..well..branches. 

I bought a whole heap (yeah, that's a technical term of measurement...) of Sculpey for this project, but only ended up using a quarter of it. More Sculpey for me!
I covered all the wire in Sculpey and I added some foil around the trunk before adding the Sculpey to bulk it out a bit.
Then, as you may know, Sculpey needs to be put in the oven to harden.
My tree only just fit in the oven! I had to take all the shelves out and was then worried that the tree would tip backwards into the flames.
The required time is between 15 and 30 minutes but when I opened the oven door after 6 minutes to check on it, a lot of smoke came out. So I thought I ought to abort the mission.
The 6 minutes was actually enough time to harden most of the branches but the trunk was still squidgy.
I put the tree back in the oven twice more with the door slightly open, but the trunk didn't get any harder.
So I gave up and went straight to painting it.

As I was painting it some of the bigger branches near the trunk started to fall apart a little bit.
Slight panic, but then I grabbed some small strips of newspaper and some watery PVA glue and papier-mached the tree Neil Buchanan style

The Sculpey is still squidgy under the newspaper, but at least it's not falling apart and I was able to finish painting it.

I'm not sure if the colour's exactly right yet, it's looking a bit grey, but trees aren't exactly brown. I like the texture I've got going on. 

Sunday, 11 December 2011

Pipe cleaner Christmas tree

 Playmobile people deserve a Christmas tree too.
I think it might be a human right...


Here's a how I made this pipe cleaner Christmas tree for my dolls house.

Start off with one green pipe cleaner and bend three little legs on the end so it stands up.
If it's a little wonky that's ok; it just makes it more realistic. I mean, who's Christmas tree actually stands up perfectly straight?
I think using a tinsel pipe cleaner would look good too, especially a silver one.

Cut up pipe cleaners into varying lengths and twist then onto the main pipe cleaner, with the longest bits at the bottom.
I think I used four pipe cleaners in all.

I added additional branches to some of the lower parts to bulk it out a bit.

Then I added a gold tinsel pipe cleaner and some red beads for the baubles.
This photo doesn't show it too well but I also found a silver star shaped bead to go on the top.

To complete the scene in my dolls house I wrapped up some random items to go under the tree and I made some paper stockings to hang on the fireplace.

Wednesday, 28 September 2011

Tire swing, swinging on a tree

This my newest miniature.
A tree with a tire swing.
It was a long time in the making but I'm happy with the finished piece.

I had tried to make a tree earlier in the summer but, well, it didn't turn out too good.
We shall call it the fail tree.

This is the fail tree.
I used chicken wire and modrock which was fun at the time (minus the chicken wire scratches on my hands) but far too bulky to look like a real tree.

Then I gave up for a while until I saw this piece by Lori Nix.
A tree!
And she explained how she made it.

So I was all set to go again with a new method.

I twisted some wire into a tree shape.

Then I covered the wire in Fimo/polymer clay. I used whatever colours I had since it was going to be painted over anyway, hence the random pink.
To get a tree bark texture I screwed up some aluminium foil, flattened it out again and pressed it against the Fimo.

Once it had been cooked in the oven (only falling over in there once) I painted it.

Then I had to put on the leaves.
The stuff you can buy in hobby shops for model railways is far too expensive for something I wasn't even sure would work, so I improvised.
I bought a cheap sponge and tore it into tiny pieces that I painted green.
Then I stuck them to the tree with PVA glue. One by one. With a pair of tweezers.

The tire was also made with Fimo (can't get enough of it after the success of the copper kettles) and I got the tread pattern by imprinting it with the tire of a Playmobile car.

And that's how I made my tree!
Related Posts Plugin for WordPress, Blogger...