home aboutme myart books shop
Showing posts with label house. Show all posts

Friday, 17 March 2023

My Craft Room

This post is probably a year and a half over due, but everything takes longer with a toddler!
In 2021 we renovated pretty much the whole of the downstairs of our house, including turning the old garage into my new craft room.

The garage was cold and damp. The previous owner of the house had extended it at the back but the new bit of roof leaked and the brickwork was crumbling. Also the electrics didn't work!

Our builders gutted it, rebuilt, insulated and boarded the space, and added two windows and a door so I have a lovely view of our garden. It's also now attached to the house via a utility room so I don't have to go outside to access it. 

This was all going on while I was pregnant and by the time the room was ready to decorate I was very big!  But that didn't stop me from getting on a ladder (very carefully with lots of supervision!) and doing the cutting in. Initially I had wanted the room to be all white but once we'd done the first coat we went a bit snow-blind so I chose to add some colour with this duck egg paint and some simple geometric lines.

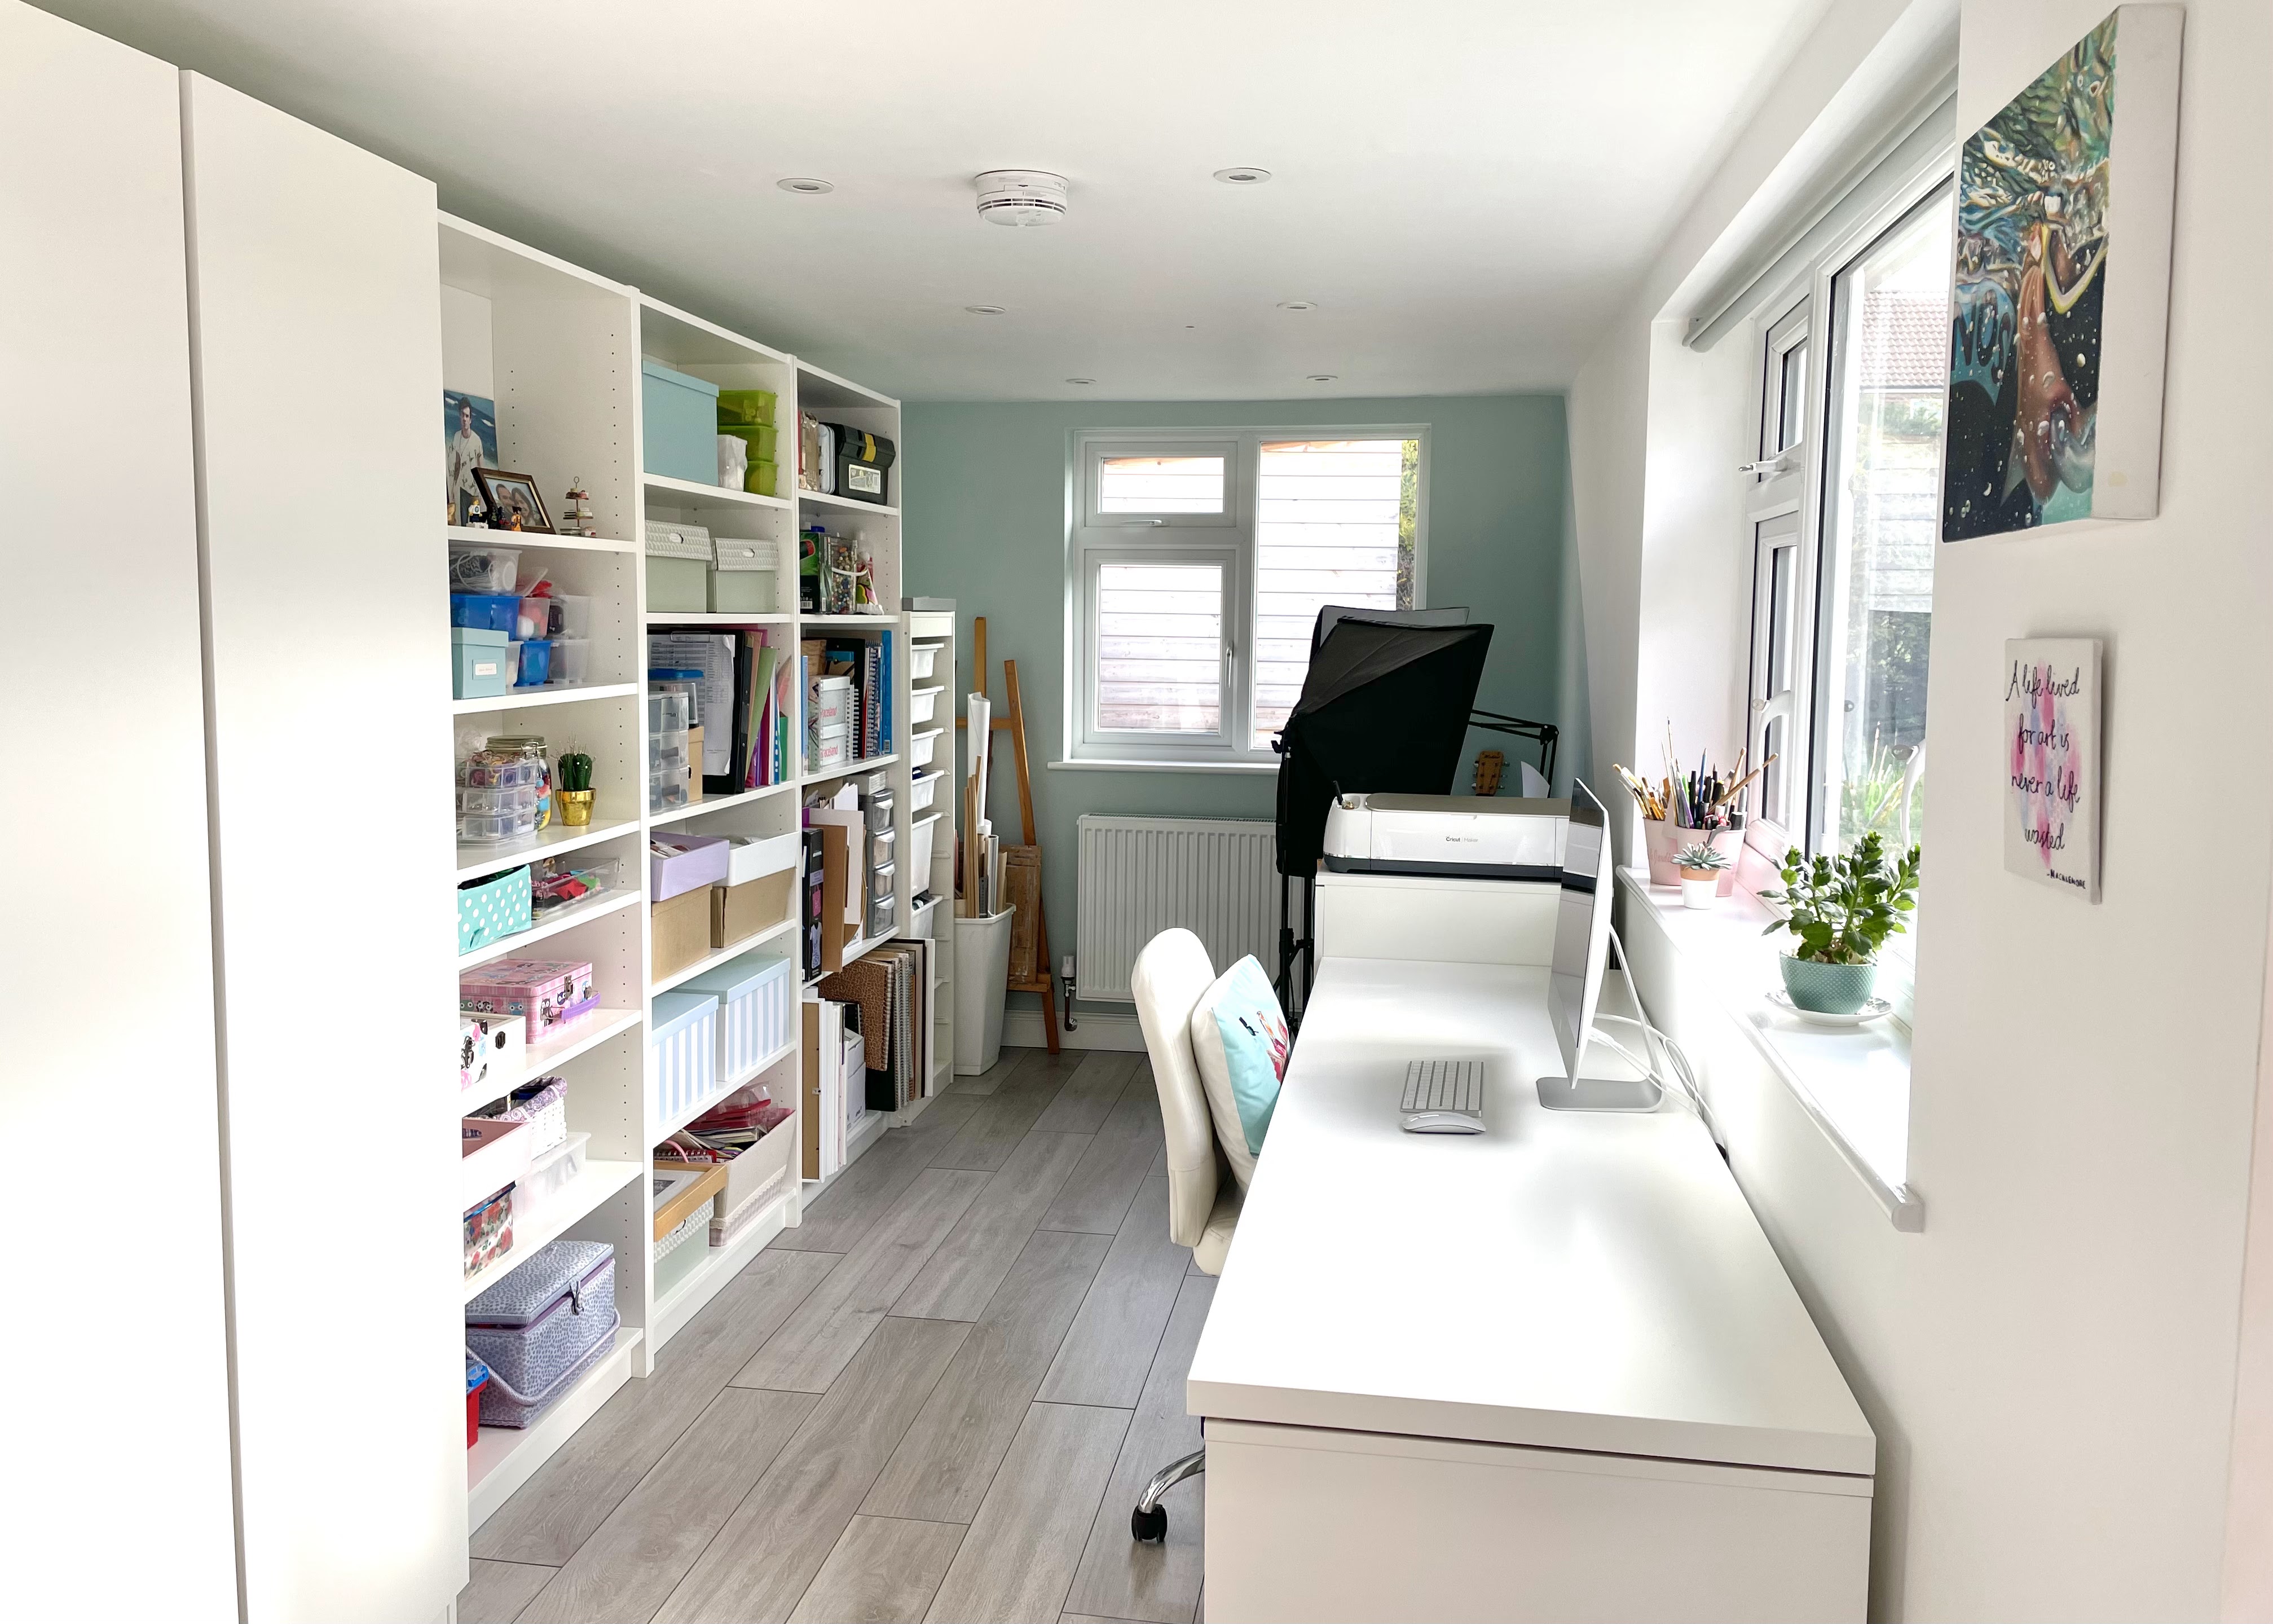
This is what my craft room looks like today. Note, I did tidy up especially for these photos. It definitely does not look this tidy all the time!

My 2 metre desk, which I've had since our last house, sits in front of the large window. We actually asked the builders to make the window wider to match my worktop. 
In previous set ups my Circuit machine has had to sit on the desk, which takes up a fair bit of space especially when it's in use, but I was able to repurpose a spare kitchen unit which fits it perfectly. I store my Circuit mats and large piece of paper and canvases in the cupboard.

At the end of the room I have a designated area for product photography. This is another thing that used to have to happen on my desk, meaning I'd have to clear it each time, and I was always having to move around my lights as they got in the way. It is so great having a spot for them which I can leave set up.

I already had a lot of the furniture in this room but I did add a few things, including these three Billy bookcases from Ikea. I wanted all of my supplies to be accessible and on display, as I'll often forgot I have something if I can't see it.

I also ordered an Ikea wardrobe which is mainly used to store all my felt.

I am so lucky to have this space. If my son is asleep then chances are this is where you'll find me.

Monday, 3 September 2018

Miniature House Ornaments

Do you remember the miniature pink beach house I made? After I posted it on my Instagram I was contacted by my favourite Etsy customer with a commission to make two miniatures houses; one of her previous apartment building and one of the house she lives in now.

Having spent most of my time at university making miniature models I always get excited at the opportunity to make something tiny. I like drawing out the plans, scaling everything down and seeing how much detail I can include.

Google street view was my best friend when working on this commission. The customer gave me the addresses of the two buildings so I was able to find them online and see them from different angles. Being able to view images from previous years on Google maps meant that if there was a blossoming tree obscuring my view one year, I could check to see if there was a photo taken in winter when this wasn't a problem.

I also find it really interesting looking at houses from other places. These buildings are in America and they look nothing like the houses I live around here in England.


I added ribbon loops to the backs of the models so that they can be hung on my customer's Christmas tree. She already has a felt dog ornament and another custom ornament so I'm slowly taking over her tree!

Monday, 2 April 2018

My Craft Room


I'm very excited to share photos of my craft room with you!
When we were looking at houses last year we knew that the second bedroom would be 'my room' for all my art and craft things, and also be used as a guest room. We were lucky enough to find a house with a second bedroom big enough for both of these functions, as we saw a lot of houses with tiny second bedrooms.

When we first moved in last August the room looked like this. Our bedroom was going to be our first decorating project so we squeezed all of our bedroom furniture into the second bedroom. It wasn't ideal but it was only for a few weeks while we got our bedroom sorted.
The previous owner had painted the end wall with this Mondrian pattern. Perfect for an art room, right? Well...some of the lines were wonky, and there was a lot of paint bleed and I was after a more fresh, white vibe. I thought it would take many, many coats of paint to cover up the pattern but when I looked closer I found that the paint peeled off!

I decided to paint all of the walls white and add colour with art and other decorations.
My Dad kindly made this picture ledge to go on the wall so I could display a lot of art and photos, and be able to switch them around whenever I want.

As this room will also be used as a guest room if we have people come to stay, we bought a day bed from Ikea. We looked at a few different sofa beds but decided on this day bed which pulls out to a double. It has two drawers underneath which I've had no problem filling with more craft stuff.
I've covered the mattress with a duck egg blue throw blanket from Wilkos and put my handmade patchwork blanket on top. The big stripey cushion is from my parents house, and I think I'll recover it when I find the right fabric, the seagull cushions, from Dunelm, were a gift, and I bought the raccoon cushion from The Range.

Once we'd picked out the daybed we found we had enough room to get a 4-square Ikea Kallax to add additional storage space, and we already had the white box inserts from another Ikea unit. (This room could also be known as 'the room that Ikea built'. Not in any way sponsored, their furniture is just so convenient!)
The globe on top is actually a lamp and came with us from the flat.

Something I knew I wanted for my craft room was a long table. When we found this house I checked the measurements on the listing again and again to make sure I'd be able fit a 2 metre work top. It fits perfectly in front of the window so it's a lovely, bright space to work at. The table top rests on two Ikea Alex drawers and cupboard. Initially I was just going to get the drawers but when we saw the set up on display in Ikea, Andrew noted there was still a lot of space underneath and suggested getting the extra cupboard. #keeper

My Dad put up the shelves, which were random ones found in my parent's garage. I painted them white and covered the tops with wallpaper the previous owner had left behind.
I also have one of my hand painted guitars on display next to my easel which is usually hidden by the open door.
My chair, which was my Chrismas present from Andrew, is from Argos and is very comfortable. The space under the table where my chair goes is also where the radiator is, so during the winter this is the perfect place to work.

Next to my desk is a double wardrobe and a single wardrobe. We used these in the bedroom in our old flat but our new bedroom has a built in wardrobe so we didn't need them there. I assured Andrew I could make use of them in my craft room so we brought them with us. As you've prbably figured out, these were also from Ikea.
I bought a magnetic whiteboard to go on the side of the wardrobe which I attached with command strips. I also attached my Macklemore lyric embroidery and a string of flower lights I've had since I was 15.

This photo shows the inside of the double wardrobe. The two drawers hold all my fabric and the bottom basket has rolls of paper. My favourite use of space is this hanger which attaches to the wardrobe rail and is used to store all my felt. It's so handy being able to separate it into different colours!


It is so nice having this space to work in and store all my things (and I have a lot of things). And Andrew likes it because it means my craft materials don't spread all over the house like they used to when we lived in the flat!

Wednesday, 21 February 2018

Miniature House Ornament

This little project came about when I was scrolling through Instagram and saw a photo of Young House Love's pink beach house in the snow and thought, 'I want to make that'. So I did! I decided to make a miniature 2D version of the house using layers of card on a wooden base.


After drawing out a template for the house I cut the shape out of wood using a saw.

To make the features of the house I used cartridge paper, brown card, mountboard and a wooden kebab skewer.

I tried my hardest to mix up the wonderful shade of pink that the Petersiks painted their beach house. I used acrylic paint on a piece of cartridge paper glued to the wooden base, which I scored with a craft knife to make the slats.

I think my favourite details are the fence at the front and the little top window. I had to work with the tiniest slivers of paper!

The house turned out just as I was hoping. I think it would look lovely as an ornament on a mantlepiece, or as a Christmas decoration if I looped some ribbon on the back.

Now I'll be on the look out for other cute houses to recreate in miniature.

Pin it!

Thursday, 7 September 2017

Geometric Wall Art


Hi guys, I'm back! If you follow me on Instagram you'll know that I moved house a couple of weeks ago, which is the reason for my blogging absence. My boyfriend and I bought our first house together and have been busy unpacking and decorating.


We've started with our bedroom where I've been able to put my first creative touch. The room has a built in wardrobe/closet space and I thought it would be fun to do a painted feature wall inside. Since this is my first experience of painting on such a big scale (ok, not true) I thought this would be relatively low risk as if it turned out really bad it wouldn't matter as the wall is going to be covered with clothes most of the time anyway.


I started by designing the wall in Photoshop. I'd searched Pinterest for geometric wall inspiration and used this image as a starting point.

With my design up on my laptop I started drawing it on to the wall. We'd already painted it grey when we did the rest of the room. Drawing the design involved a fair bit of measuring which I didn't mind, especially when I found a website which did equilateral triangle calculations for me.

Then it was time to paint. I'd say it took me about two long days altogether, and lots of podcasts. I decided to do the whole thing freehand and not use tape as I haven't had much success with it in the past. Mostly because I'm not willing to pay out for the good stuff #cheapo. So instead I used a small brush and a steady hand for the outlines of the shapes.

These are the different paints I used. The Dulux 'Chic Shadow' is the colour of the rest of the bedroom and the base colour of my design. The small tester pot in 'Slate' was left behind by the house's previous owner and turned out to be the perfect dark grey, although there wasn't quite enough of it so I had to alter my design slightly. I mixed the silk black paint (another one we inherited from the previous owner) with the white emulsion to make another shade of grey. Then for a pop of colour I used a tube of gold acrylic paint.


I'm so happy with how this wall turned out. I think I got the size of the pattern and the colours just right.


It's almost a shame to cover it up with our clothes, but we need the storage space! And we'll get glimpses of it when we're getting our clothes out. Maybe now I'll try something on a more prominent wall.

Pin it!

Tuesday, 24 February 2015

Cardboard House

The class I work in's topic for this term is Houses and Homes so over half term the class teacher asked if I would make an example house that the children can look at in their art lesson.
Make a tiny house? Yeah, I think I can manage that.

The teacher suggested I take photos of the stages to show the children since they'll only be looking at the finished piece. I'm going to teach those kids the magic of turning a cereal box inside out! 

The next stage is papier mache. I only did one layer of newspaper because it's just to stick all the boxes together, rather than strengthen the model.

And then it was time to paint! I could have put a lot more detail into this but I really didn't need to so I resisted and put my brick stamp away. I still really like it though and I think it will give the children something to aim for and be inspired by.

Thursday, 7 November 2013

Gingerbread House Ornament

This post is more to share an idea than a finished product. Because the finished product didn't turn out too great...but I still like the idea!

Having made gingerbread men ornaments I thought a gingerbread house ornament would be fun, and you know how I like making miniature buildings.

I made some simple houses out of card and put a loop of gold thread between the roof so that they could hang.
I painted the houses with acrylic paint. The colour may have been the first mistake. It looks maybe a bit too orange for gingerbread.

For the icing/frosting detail I wanted something three-dimensional to replicate the real stuff.
I found this big tube of filler for 99p and thought it might be perfect for the job.

My Mum made me a piping bag out of greaseproof paper and I squeeze some of the filler in.
The piping in this photo isn't too bad, but other areas were a hot mess.
My piping skills aren't that bad - see last years actual gingerbread house - but the filler is thicker than icing and doesn't flow as well.

 This is what I ended up with.
I think the cardboard is too flat/lacking texture compared the filler which is maybe too big for the scale of the houses.

Any ideas for alternative ways to do this?
Or any other uses for the filler now that I have a whole tube of it?

Friday, 29 June 2012

The Degree Show

The degree show opened earlier this week and we had the private view on Tuesday.

To see how I made the tree piece click here and here.

And these are the deets for the house; wallsbricksinteriorpavingporchappliancesfront bedroomrubbish binroofback bedroomdetails

Our business cards are all kept together in these specially made pigeon holes.
Here's Natalie modelling mine.

My work seems to be getting a fair bit of attention. I love seeing people walk around the entire house and peer into each window.

And so that you guys don't feel left out, here's a video showing my work so you can view it as if you're there!
(If you're one of my friends or family that are coming to see the show, don't watch this video. Spoilers people!)


The other artist who have work in this room are Clare MillsAndy ReeveJon Jensen, and Will Reid.
Andy has already sold two of his piece. One of them was to John Hurt.
You know, famous actor John Hurt. He's the new provost for our university.
When he looked round he didn't seem to interest by my work, as he was too busy figuring out which of Andy's he was going to buy (the most expensive!).
But his wife had a good look at my work!

If you happen to be in Norwich the degree show is on until Tuesday 3rd July.

Tuesday, 22 May 2012

House progress: It's all in the details

All that's left to show you of my model house are the finishing touches.

Like the scattered leaves (mixed herbs) around the drain pipes.

The pink umbrella in the porch.

The slate house number and the doormat.

The concrete passageway down the side of the house.
Note the handy mirror in the background that makes the house look like it's part of a neighbourhood.

Here's hoping the examiners like what I've made.

Related Posts Plugin for WordPress, Blogger...